Making Additional IPs as Source IPs
When you buy a server with the main IP and assign additional IPs, they are routed statically. Therefore, no gateway or broadcast addresses are needed when configuring the IPs on your NIC.
However, when using additional IPs, the default route of the server is still via the gateway of your primary IP. So, how do you reroute all traffic via an additional IP?
In this example, we are using a Cloud Hosting server with CentOS 7 OS. The main IP is 185.142.27.190. The additional IP is 141.98.89.0/32, and we have already assigned it to our server via Terminal.
Note: Once you assign additional IPs to the server, do not forget to perform stop/start of the server to complete routing. Otherwise, you might not see the desired results.
All in all, changing the default route is not complicated. It can be done temporarily or permanently.
The temporary solution
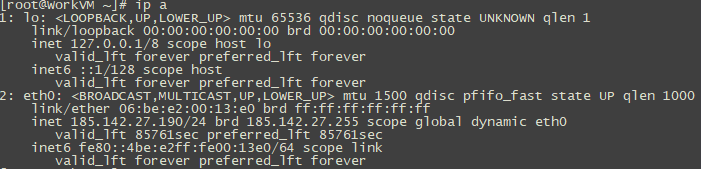
Check the network configuration:
ip a
Inspect the results:
Add the additional IP:
ip addr add 141.98.89.0/32 dev eth0
Check the network configuration again:

We can see that the IP address was added successfully.
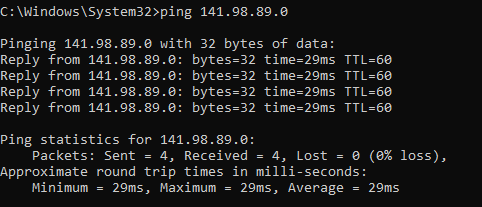
As we check using a different computer/server, we can see that the IP address gives ping replies:
Now, check the default route:
ip r

Let’s change the default route of the source IP:
ip r change default via 185.142.27.1 src 141.98.89.0
Inspect the results:
That’s it! The traffic has been rerouted to go via the additional IP.
Note: After you perform a network service restart or after you restart the server, the changes will be reverted back to defaults.
The permanent solution
It is just as easy to apply the permanent solution.
Let’s edit the
/etc/sysconfig/network-scripts/ifcfg-eth0
file (if your network interface name is eth0):
vi /etc/sysconfig/network-scripts/ifcfg-eth0
Note: Since we use a Cloud server as an example, we need to configure the IP address statically.
Here is how our configuration looks in our example:
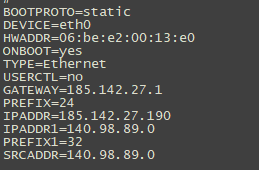
Make sure there are no mistakes in this file. We suggest you configure the static IP first and then restart the network service. Afterward, configure the second IP in the same file and then add the SRCADDR (source address). Otherwise, you might lose connection to your server. In such a case, use the virtual console via the Heficed Terminal to reach your server.
Check the results:
ip r

To keep the changes permanent after a server reboot, edit the file:
vi /etc/cloud/cloud.cfg
Add the following line:
network:
 config: disabled
Save the file and restart the server.
Was this article helpful?
Need support?
If you need any further help, don't hesitate to send a support request to our support team.