How to use Heficed API
This guide explains how to start using Heficed API to manage Heficed services. Heficed API documentation can be found by visiting https://api.heficed.com/docs/
To start with Heficed API login to your Terminal and go to API > API keys. There you will need to create an application that can access selected services:
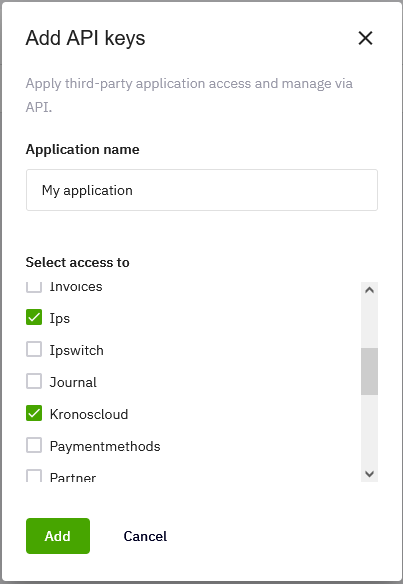
Enter the application name and select the services that you wish to access with this application. Confirm the changes by clicking Add button.
At the next step you will receive your client ID and client secret:
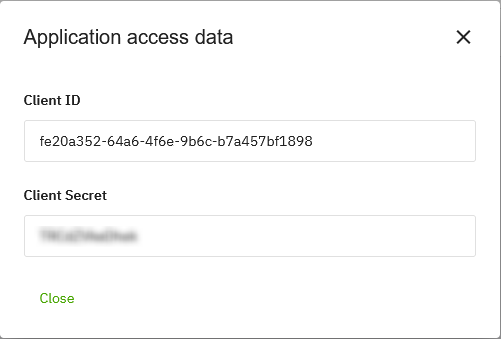
Copy and paste client secret somewhere safely since it won’t be visible again after clicking Close.
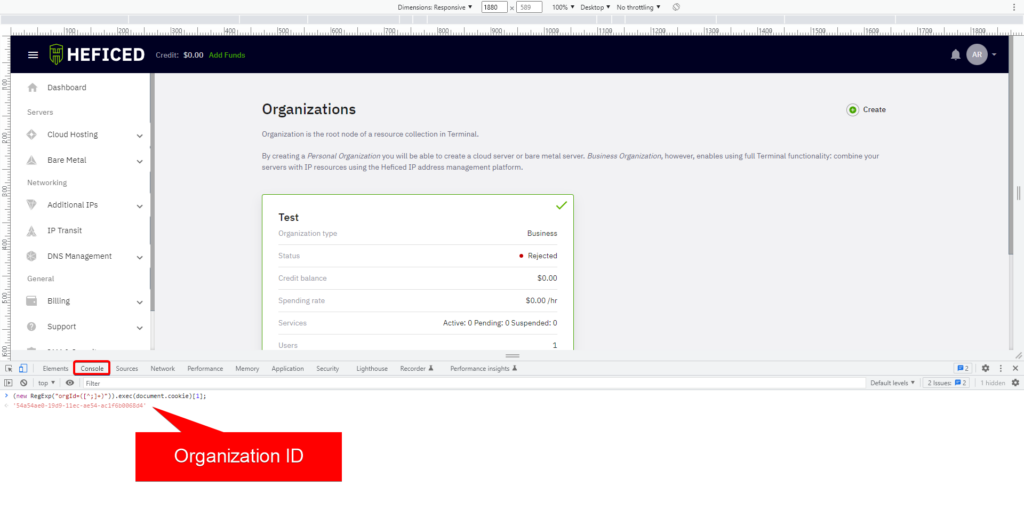
The next step is to get our organization ID which can be obtained by going to your organization https://terminal.heficed.com/organization
If you have more than one organization then select the organization that ID you require. Then open your web browser console, usually, it’s opened by pressing F12 and enter the following line:
(new RegExp("orgId=([^;]+)")).exec(document.cookie)[1];
You will get your organization ID in the output:
Copy and paste this somewhere safe too since it will be required later.
The next step is to get an access token. The access token can be received by issuing a request to the following URL with certain parameters such as client ID, client secret, and specifying with which services this access token will be in use.
https://iam-proxy.heficed.com/oauth2/token
The syntax of this request is as follows:
curl -u client-ID:client-secret https://iam-proxy.heficed.com/oauth2/token -d 'grant_type=client_credentials&scope=service'
This request can be executed from any device that has an SSH command line and curl package. Make sure to replace client-ID, client-secret, and service with the actual values. All scope values are available here https://api.heficed.com/docs/#section/Authentication/oauth2. For example, to get an access token that can access cloud servers use the following command:
curl -u fe20a352-64a6-4f6e-9b6c-b7a457bf1898:TRCdZVkeDhek https://iam-proxy.heficed.com/oauth2/token -d 'grant_type=client_credentials&scope=kronoscloud'
Make sure to replace client-ID and client-secret with your actual values. The output should look as follows:
{"access_token":"BngOcpzhG9M36VGBrILqnbcHOqYUQjWcUm1nn3MqXG0.dalzzRy9FJI5in-6ofgmLZ1OXB26nuuVtQ1bD7y4diI","expires_in":86399,"scope":"kronoscloud","token_type":"bearer"}
Now that we have an access token we can start running API calls. For example, to get cloud instances to use this API call https://api.heficed.com/docs/#operation/List%20Kronos%20Cloud%20Instances
To execute API calls we will also use curl with our organization ID and access token:
curl -k -X GET "https://api.heficed.com/7bddbff3-2dfb-11e9-895d-c8dbf32f12cd/kronoscloud/instances" -H  "accept: application/json" -H  "Authorization: Bearer BngOcpzhG9M36VGBrILqnbcHOqYUQjWcUm1nn3MqXG0.dalzzRy9FJI5in-6o
fgmLZ1OXB26nuuVtQ1bD7y4diI"
The output should look as follows:
{"data":[{"id":312019,"status":"running","hostname":"hhVyA97bBk","instanceType":{"id":"linux","name":"Linux"},"location":{"id":"uk-lon1","name":"London, United Kingdom","continent":"Europe"},"inRescueMode":false,"template":{"id":"92b22afd-ad6a-4cb1-b9f7-91c2a7b1877b","created":null,"size":null,"version":null,"name":"CentOS 7 v2.0.23","locationId":{"id":"uk-lon1","name":"London, United Kingdom","continent":"Europe"},"instanceTypeId":{"id":"linux","name":"Linux"}},"iso":null,"network":{"v4":{"ipaddress":"2.58.28.45","netmask":"255.255.255.0","gateway":"2.58.28.1","additionalIps":[],"resolvers":["181.41.222.18","181.41.223.18"]},"v6":{"ipaddress":"2a03:fbc6:1:829a::","netmask":48,"gateway":"2a03:fbc6:1:8000:8000::1","additionalIps":[],"resolvers":["181.41.222.18","181.41.223.18"]}},"billing":{"product":"Kronos Cloud","type":{"id":1,"name":"monthly"},"status":"active","hourlySpendingRate":null,"invoiceId":684282,"invoiceStatus":"Paid","price":0.0,"startDate":1613174400,"endDate":1627257600,"sla":{"id":0,"name":"Standard"},"cancellationRequest":null},"vcpu":1,"memory":512,"disk":10,"ip":1,"backup":0,"additionalDisk1":0,"additionalDisk2":0,"additionalDisk3":0,"additionalDisk4":0,"additionalDisk5":0,"additionalDisk6":0,"additionalDisk7":0,"additionalDisk8":0,"cpuLimited":false,"networkLimited":false,"password":"4ASVzIQchBBD"}],"links":{"paging":{"self":"\/7bddbff3-2dfb-11e9-895d-c8dbf32f12cd\/kronoscloud\/instances?limit=200&offset=0","next":"","previous":""}},"metadata":{"paging":{"total":1,"limit":200,"offsets":{"current":0,"next":null,"previous":null},"sort":null,"sdir":null}}}
Note in the API request the parameter “GET” which defines what type of request it is. If it’s GET this means we are requesting information. There might be also the following parameters:
- POST – to send/submit information,
- PATCH – to update information
- DEL – to delete information
Additionally, the URL must include your organization ID.
Let’s try POST request with this API call https://api.heficed.com/docs/#operation/Stop%20Kronos%20Cloud%20Instance which will send a request to stop a cloud server whose ID is 312019.
curl -k -X POST "https://api.heficed.com/7bddbff3-2dfb-11e9-895d-c8dbf32f12cd/kronoscloud/instances/312019/stop" -H "accept: application/json" -H "Authorization: Bearer R1fIGYkyaAOXeZqzToz7bKGJr-tG79K7DghirizKBK8.IGX3elnv6aDmtE54v4iL7IPwX9ZyBfJlOb40LMtEPwY"
The output should look as follows:
{"id":881626,"instanceId":312019,"entityType":"vm","group":"cloudServer","action":"stop","statusCode":0,"status":"pending","resultCode":0,"result":null,"timeCreated":1625058478,"timeUpdated":null}
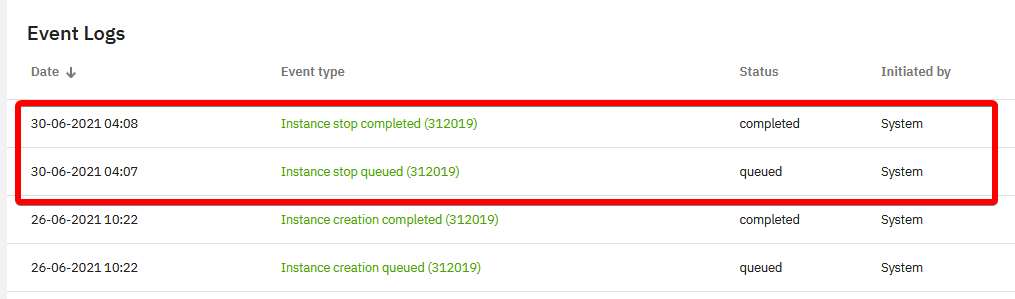
The action can also be confirmed by checking Event Logs in the Terminal:
The next example shows how to assign an IP address to the cloud server. Route IP address 185.194.29.0/32 to the server which ID is 337201:
curl -k -X POST "https://api.heficed.com/25efb541-2f8d-11e9-895d-c8dbf32f12cd/ipswitch/v4/subnets/route/kronoscloud/337201" -H "accept: application/json" -H "Content-Type: application/json" -d "{\"0\":\"60bde87f311fc2ed1f6aeac9\"}" -H "Authorization: Bearer fablW6IWudUTn5CNgWR4hBGajPLaa0MIKIs7sHAVmX8.heGC0lc7Ik6PfVebUMbdWlf9f8_Jk-guk2XhWSXloCo"
Note the ID 60bde87f311fc2ed1f6aeac9 is the ID of IP address 185.194.29.0/32.
Result:
{"id":872825,"instanceId":337201,"entityType":"ipv4","group":"","action":"route","statusCode":0,"status":"pending","resultCode":0,"result":null,"timeCreated":1623559718,"timeUpdated":null}
To route more than one IP address adds its ID as a second array element, for example:
{\"0\":\"60bde87f311fc2ed1f6aeac9\,\"1\":\"60bde87f311fc2ed1f6aeacb\"}
If you have any questions regarding Heficed API, please contact our Customer Support team via Live Chat or send us an email to support@heficed.com.
Related articles:
Was this article helpful?
Need support?
If you need any further help, don't hesitate to send a support request to our support team.